


Planting a hedge can be a tricky business, not least because the best (and cheapest) time to do it is during the ‘dormant’ season. In Ireland this is generally between November to the end of March, a time when most of us want to be tucked up in front of a cozy fire. Timing is crucial however, as we should never work with the soil when it’s frozen, wet or covered in snow. If you’re planning to plant some hedging, this guide should help you through the process and make sure your hedge grows to be strong and bushy.
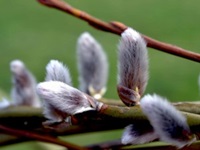
Buds appearing? An indicator that it’s too late for bare root hedging
Choosing hedging
We opted to plant deciduous, native hedging around the perimeter of the Greenside Up garden that included Birch, Beech, Hazel, Blackthorn, Hawthorn, Gelder Rose, Hornbeam and Oak. This provides privacy as well as shelter from the harsh, upland winds across the open fields. Native hedging also helps to encourage a range of birds, pollinators and insects that help with our natural approach to pest control.
The hedging ‘bare roots’ can be purchased very inexpensively and because they’re not trying to grow leaves or buds, will settle their roots quickly and all being well, not dry out.
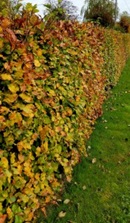
A neatly trimmed beech hedge in late October
If you’re looking for all year colour from evergreen plants or the best hedging plants for exposed or wet sites, or particular soil types, head to a reputable nursery or garden centre to seek advice on the best type of hedge to suit your needs and the environment in which the hedge will be planted.
How to plant a hedge
Site examination
First of all, take a look at your site to check if the soil is suitable for hedge planting.
If the ground is wet, you may have to add bulky organic matter to the soil such as well-rotted manure, to raise the aeration. If it’s severely waterlogged you may have to consider adding drainage pipe and stone before you begin planting.
Site preparation
Once you’ve established that the area is suitable for planting, it’s a good idea to mark it with twine to make sure that only this area is prepared and it’s straight.
There are a couple of ways you can go about planting the hedge but it’s strongly recommended to remove any grass or weeds first. If you’re gardening without chemicals, you can either do this by covering the area with a piece of weed proof membrane or black plastic which will prevent sunlight reaching the weeds and eventually kill them off, by using a strong solution of distilled vinegar and water and spraying the area, or by hand weeding. Do this for about 30cm each side of where the hedge will be planted three or four weeks before the planned planting time to allow the weeds to die down.
Plants arriving on site
Whether you choose and buy your own hedging, or have your plants delivered, bare rooted plants normally arrive inside plastic bags and should be treated carefully. It’s essential that they’re not allowed to dry out or be exposed to frost. The bags should be kept standing up in a sheltered area away from wind etc., and checked upon arrival to make sure that the roots are damp. The quicker the hedge is planted the better. If you can’t get out and plant the bare rooted hedging within a couple of days, the plants should be removed from the bags and heeled in (stood upright in a trench and the roots covered with soil).
How to plant your new hedge
There are two main ways to plant a hedge.
- Using a small digger
- Using a spade
Most hedges can take six plants per metre. They can be planted in two staggered rows that are 25cm apart and 45cm between each plant. Damaged or dead shoots can be removed at planting.
The hedging plants should only be removed from the bag as they are being planted and the roots covered with soil to make sure the roots don’t dry out.
Digger method (Known as Strip Planting)
If you’re facing a long stretch of hedging, there’s no better way! Mini diggers can be hired relatively inexpensively for a morning or full day, or landscaping business’ will bring their own. If using a digger, dig a trench 30 cm by 30 cm then insert a garden fork into the bottom and the sides of the trench to loosen the soil to aid good root penetration and drainage.
Place the plants in the trench and cover with soil. Bare rooted plants should always be planted to the same depth as they were when lifted in the nursery. You can tell this by looking carefully at the stem which will be green and brown. Plant to where the two colours meet.
The new hedge will need to be thoroughly watered in after planting.
Spade Method Known as Slit Planting
This entails cutting a slit in the ground and holding it open with a spade whilst the roots of the plant are carefully inserted and spread downwards.
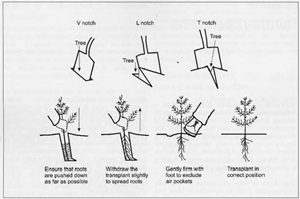
Diagram to Illustrate Slit or Notch Planting of Bare Root Hedging (from Dobson & Moffit 1993)
Care and maintenance of your new hedge
It’s important to keep your new hedge as grass and weed free as you can for the first three years to make sure they’re not competing for water, light and nutrients. Also, if weeds and grass are growing around the base of your new hedge it will be bare in the bottom. Adding a thick layer of mulch such as wood chips, straw or well-rotted farm manure around the base of the bare roots will help to keep the weeds down if you’re avoiding herbicides, but make sure the soil is wet before you do so.
Livestock will decimate a new hedge (or an old one) in their bid for a tasty meal so take steps to protect it if necessary. For more information on planting stockproof hedging, Teagasc have a helpful factsheet that you can find here.
Simple pruning will help to encourage bushy growth.
By following the steps above you should be able to successfully plant a lovely, bushy hedge in your garden.
Source: GreenSideUp – A Simple Guide to Planting Hedging – Dee Sewell


