


If you’re looking to add some old world charm to your garden beautifully aged terracotta pots might be just the trick! A classic in any garden, terracotta pots add a feeling of warmth and ease to any space – whether a small courtyard or sprawling garden.
Below we have our gardener’s advice for aging brand new terracotta pots. The yoghurt accelerates the build up of chalky residue on the pots similar to the residue left by minerals in water and general weathering.
This is also a great and fun way to get children involved with the gardening!
Step One:
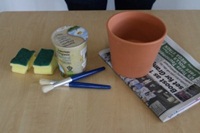
Gather materials: A terracotta pot, newspaper, natural yogurt, sponges, and paint brushes.
Step Two:
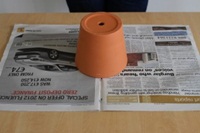
Begin by laying out newspaper on a flat surface. Then, place the Terracotta pot with the bottom facing up on the table.

Step Three:
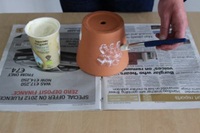
There are three techniques that can be used to apply the yogurt. The first is using a paintbrush and applying the yogurt in a line.
There is no right amount of thickness when it comes to applying the yogurt. Feel free to play around, making some areas have more yogurt than others.
Step Four:
The second techniques is spotting. To do this technique, take a paintbrush, dip it into the yogurt and lightly tap the brush on the pots.

Step Five:
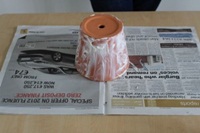
The third and final way to apply the yogurt to the pot is with a sponge. Begin by dipping the sponge in the yogurt, then proceed to swipe on or sponge the yogurt on the pot.
Step Six:
Once the yogurt is applied using the desired technique and is fully covered, place the pots outside in the sunlight until the yogurt has dried and hardened.

Step Seven:
Once the yogurt has dried, wash it off in the sink or with a hose. There you have it! Your aged terracotta pot is finished and ready to use.


